
Original Post:
Starting to Sew
[Thursday, January 14, 2010]
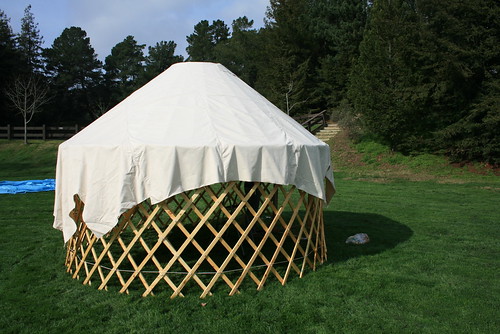
I am now starting to sew the canvas cover for the yurt. I am using a 13oz Sunforger canvas for the roof. It is all cotton that has been treated for water and mildew resistance. The color is natural. The roof should be light in color to let in the sun and also the lighter the color, the longer it will last against UV (since it reflects more light away instead of absorbing it if it was a darker color). I needed 34 yards for the roof, and the roll is 36 inches wide. I ordered the natural canvas from Kronke Co. in Hayward, CA. It was very convenient that they weren't too far away, because I went to their store to pick up my order instead of shipping it. Plus, the guy there was really nice over the phone.
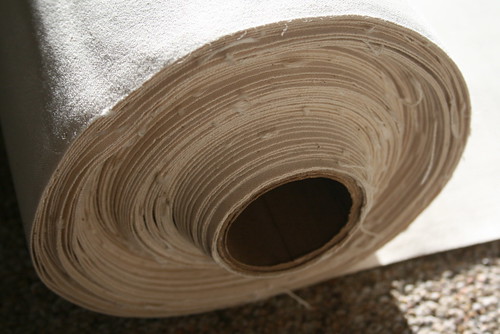
34 yards of Sunforger canvas, 36 inches wide.
I also bought thread from Kronke Co., as it was convenient to just get everything together. To sew heavy duty material like a 13oz canvas, you have to use heavy thread as well. I bought a V92 weight polyester thread which is bonded. Make sure you buy the bonded stuff, because that really increases the strength. It feels thicker than normal thread, and it almost feels like there is a layer of wax or something over it, making it smooth. I bought 4 spools which were 4oz each.
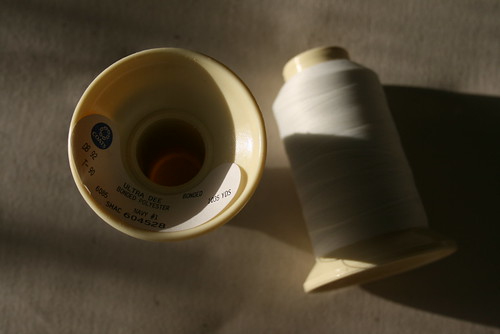
Two spools of V92 polyester bonded thread.
The sewing machine also must accept at least a No. 20 size needle. John, who let me use his industrial sewing machine (THANK YOU JOHN!), also gave me a set of No. 24 size needles, which I have been using with the V92 thread. It has worked fine so far. In addition to the industrial sewing machine, I bought an old White brand home sewing machine on craiglist for $25. I really love it! It is teal, chrome, and black. I think it must be from the early 70s. The home sewing machine was able to accept the No. 24 needle as well as the V92 thread. Before I started sewing, I made sure to oil the machines.
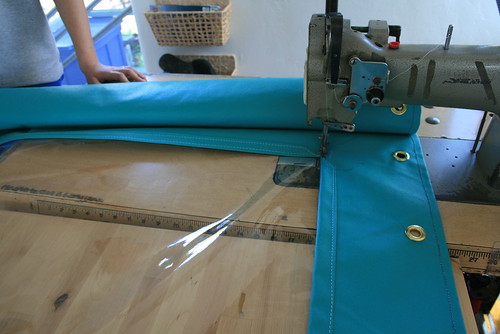
Today I began sewing the roof together. It involves sewing long strips of the canvas together, and then making a cone shape. I only got to sewing three strips together, because it took a long time. Each strip was about 16 to 18 feet long, and each seam involved three length-wise stitches. I made french seams, which are strong and water resistant. I am using the pattern provided in Paul King's book, The Complete Yurt Handbook, although I double checked all his measurements (they check out).
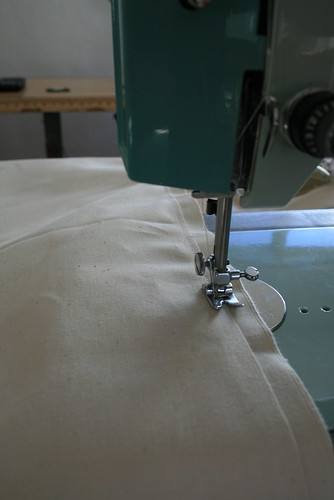
Starting a French Seam on my home sewing machine.
When I used scrap fabric as a test, I learned that the home sewing machine can only punch through two layers of the canvas. When I added a third layer, the belt which drives the machine started slipping. But that was okay, because I didn't want to over work the machine, since I did have the industrial sewing machine too. The problem with the industrial one is that it is VERY hard to control. When you press down the foot pedal, the machine goes crazy - it sews very fast and hard. It has a motor which weighs 50lbs or more, and can seriously drive an air compressor. The machine can probably sew through metal! Not really, but it is a crazy machine. So first, what I did was sew the two canvas pieces together in two layers with the home sewing machine to start the french seam, since I was able to better control it. Then I took the fabric to the industrial machine to finish the seam, which involved sewing through four layers of canvas. Since the two pieces were already together, it didn't matter how crazy the machine got on me, at least I didn't have to line anything up. All I had to do was hope to sew in a straight line.
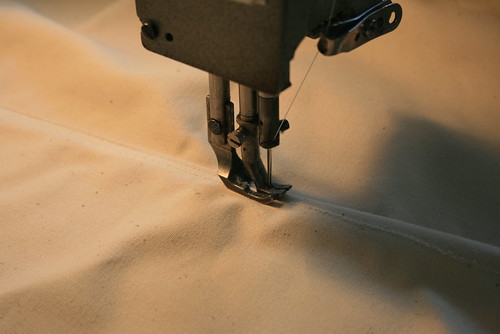
Completing the french seam with the industrial sewing machine.
So that's it so far. My sister is coming to visit in February and we will have a yurt canvas sewing party. The goal is to finish all of the sewing and have the cover completely done by the time she leaves. I think we can do it!

A close up the a completed french seam.
----------------------------------------------------------------------------------------------------
Original Post:
Fitting the Canvas Roof
[Saturday, February 13, 2010]
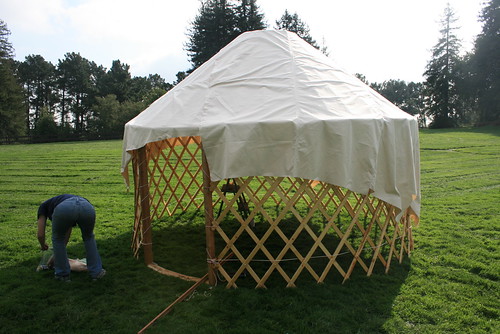
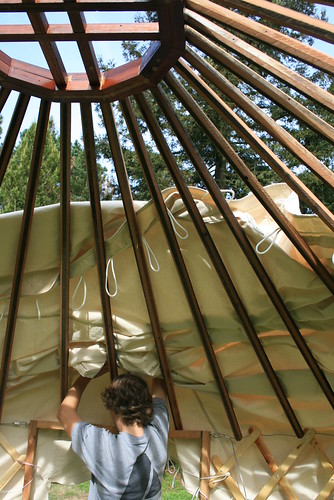
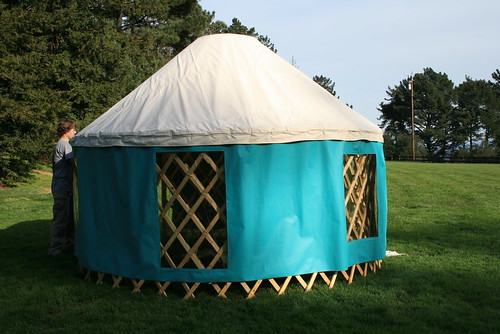
The yurt roof cover being fitted.
It finally got sunny outside and dry enough to take the yurt out and fit the canvas cover that I made almost one month ago. It started out flat - a bunch of 36" wide strips of canvas sewn together, so that when brought to a cone shape, there would be just enough overlapping material to cover the roof. I used Paul King's book and his 12 foot yurt patterns, although I didn't like following his measurements. If anybody is making their yurt roof canvas following his pattern, be aware that some dimensions are missing, and that you will have to make some of the strips considerable longer (he only marks the shortest dimensions). WARNING! Make sure you look hard and think about each strip before you cut. I almost screwed up.
Don't look at my butt!
When fitting the roof material, you have to allow the shortest section to come right above the door. That's where the fabric comes and overlaps. That's where we pinned the overlapping flaps together with safety pins so that we could keep the roof on tight. It helped that it wasn't windy at all. It turned out a very nice, sunny, warm, and wind-free afternoon. We got lucky!
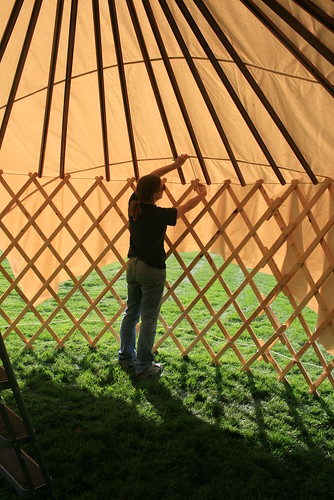
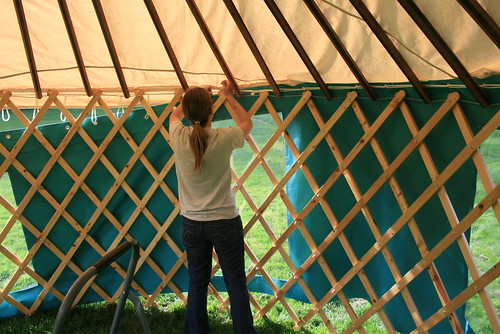
Romy pinning some of the canvas in place.
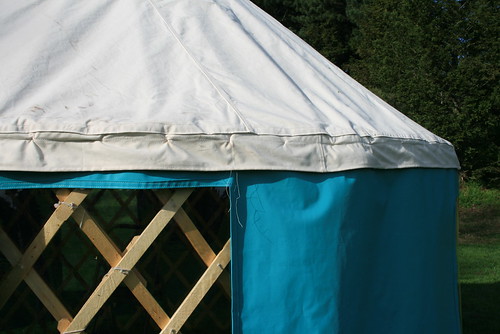
You might also notice that there is an excess of fabric hanging off the sides. Not all of this is needed, but I am going to save about 8" to make a roof band. The band will have two layers, one to protect the side of the yurt when it rains, and the other flap to attach the yurt wall canvas to. I decided to go with the method that Colorado Yurt CO uses, which is to attach the yurt wall canvas directly to the roof instead of the khana (lattice wall). This makes the roof line tighter because there is an even weight always pulling down on the roof. The grommet work and ropes that connect the wall canvas to the roof canvas will be hidden by the flap of roof band that also serves to protect the the top of the walls from rain.
Inside the yurt.
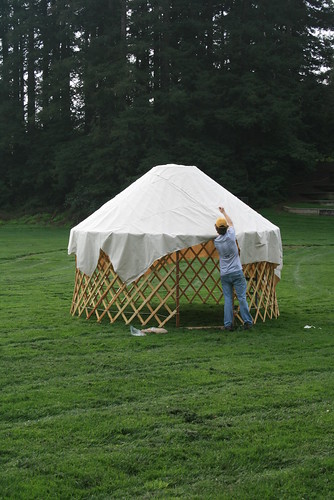
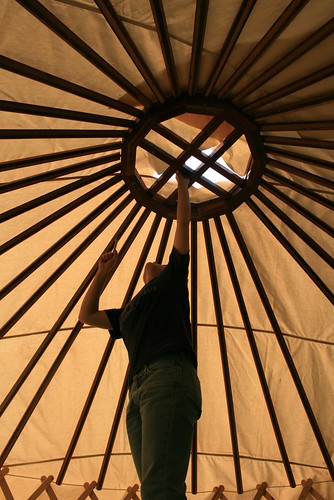
After pinning everything, I also had to mark out where the crown was, so that the fabric all bunched up on the top could be cut away, allowing a nice hole for the crown. I will later integrate a bug screen in the crown so that we can keep the crown 'open' but keep the bugs out. I will also make a removable rain cover for the crown, which can be thrown over the crown to keep the rain out (or keep extra heat in).
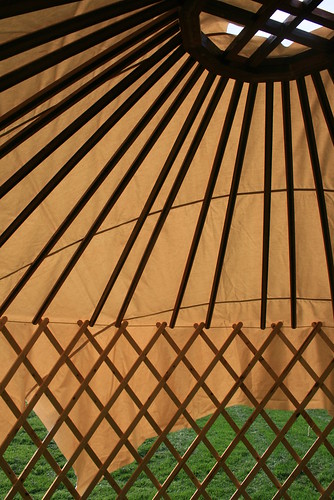
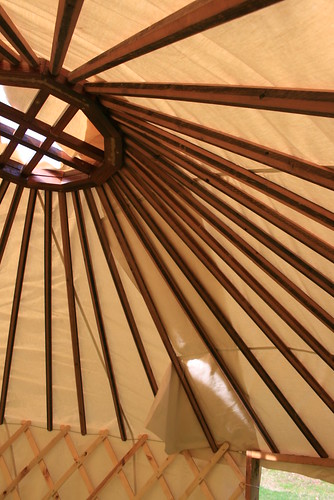
The characteristic rainbow arc, created by the seams of the roof canvas.
If you use the strips of canvas pattern, made popular by Paul King, you will find these beautiful rainbow arcs that are created by the seams in the canvas, where each strip was connected to the next. If your seams are tight and straight, it looks awesome! Some yurt companies make custom roof covers which have an insert of heavy duty clear plastic instead of one of the canvas strips, so it looks like you have a rainbow of sky!
Jenn noting some measurements/dimensions.
When we built the roof this time, almost all of our poles fit how they should, so we got it in the circle shape better. Our roof angle ended up being 35 degrees exactly. The canvas roof cut off angle ended up being between 110 degrees and 112 degrees. Paul King suggests 117 degrees in his pattern, but this must correspond to a roof angle closer to 30 degrees or so. Since we had a slightly higher angled roof, our cone must be tighter, hence the smaller cut off angle.

Canvas material all bunched up over the crown.
At the park that we built the yurt, Robert's Regional Park in Oakland, the rangers and the managers already know us! The first time we came there, last month, the rangers and other park patrol people kept talking to us wondering what we were doing. But when we fit the canvas, they didn't bother us, except for the one manager on his golf cart (he didn't bother us, he just came to talk to us). He came as we were packing up, and was upset that he missed seeing the yurt up with the roof. He really liked the yurt, and told us that next time we come, we should let the rangers in the office know so that they can take pictures and put it up on the park website! Haha, my yurt will be famous!
Marking the crown.
----------------------------------------------------------------------------------------------------
Original Post:
Sewing the Canvas Wall
[Tuesday, February 16, 2010]
This past weekend, Nicole flew here to Oakland to come and help me sew the canvas wall of the yurt, and help me finish the canvas roof. It was really nice having a second person help measure, cut, and handle the fabric because the canvas is sooooo heavy, and the wall canvas in particular was a little stiff, making it hard to handle. Sometimes, we needed a third person (Romy), to help align and push fabric through the sewing machine. We worked all day, and late into the night sometimes too. It was really fun work, even though sometimes we got frustrated, broke a few needles, ran out of bobbin at the worst times, etc. But the sewing machines never let us down!
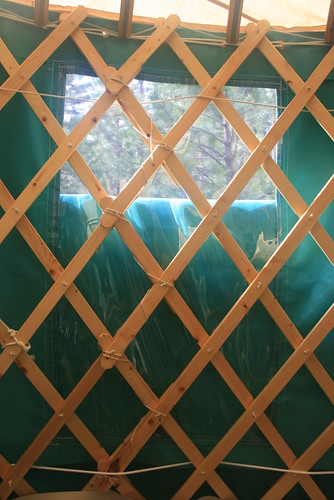
I used a 13oz water, mildew, and fire resistant canvas, which was dyed turquoise for the walls. The roof canvas was also a natural 13oz canvas, but was only treated for water and mildew resistance. The fire resistant coating makes a huge difference in the way the fabric looks and feels (and smells). The turquoise fire resistant canvas is stiffer and kind of shiny. The natural canvas is more flexible and easier to handle in the machine.
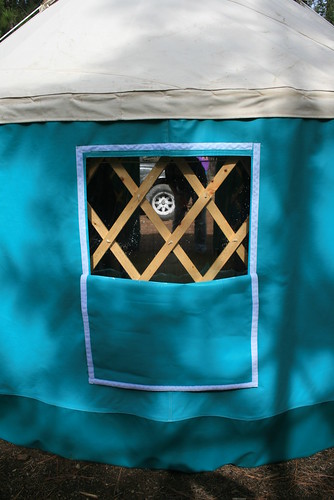
I also bought a 20 gauge clear plastic "fabric" for the yurt windows. It was really clear, and cost about $10/yd. There is no need to go any heavier, unless you are making large windows. I limited the width of each window to about 2.5ft so that the windows didn't take too much of the weight of the walls. We made 5 windows total, two of them were long (spanned almost the whole height of the wall), and two of them were medium length.
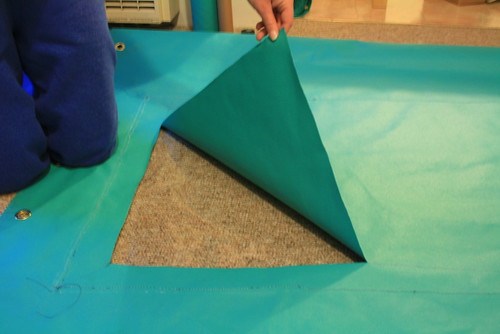
Cutting out the fabric behind the window.
To sew the windows on the walls, we first sewed the plastic onto the side of the fabric which will be the inside of the wall. Once it was sewn in place, we cut the back of the fabric away, exposing the window. In the picture above, you can't see the plastic window, but its there, believe me! We left about 2.5 inches of scrap so that it was easy to fold it back to make a nice border around the window. The corners were left exposed (they had no border), but we decided that it can be covered by a small triangle shaped trim I'll sew over it later.
Sewing the flaps into a nice border around the windows.
We also placed brass spur grommets at the top of the wall every 7.25 inches. Why 7.25in? I don't know, I just made that number up. I thought that spacing would be good to support the wall. The total amount of grommets was about 60, I think, supporting a wall 36ft long. I used 1/2inch spur grommets (#4), which required a special tool. The tools, called a die set, and hole puncher, are specific to the grommet size, so you will have to buy the same size tools and hole puncher as you do grommets. I ordered my tools and grommets from Sailrite.
Me and Nicole (my twin sister) with a finished window. You can also see the grommets.
Once the windows and grommets were done on the wall, that was about all that needed to be done (for now). So next we moved on to finishing the roof. We first sewed together the final seam which completed the cone shape of the roof. Then we cut off the scraps which hung over the sides to make the roof circular. Then we sewed a roof band along the circumference of the roof to make a tight roof line. On the inside of this roof band, we sewed a series of rope loops which were spaced at 7.25 inches, the same as the grommets. The loops of rope fit through the grommets at the top of the wall to join them together.

The rope loops sewn on the underside of the roof, along the circumference.
Just getting to this point took us almost two days. The wall was still not completely done, because we still had to sew on the bottom band, a strip of vinyl or plastic material (not canvas) which will be in contact with the ground and be tucked underneath the khana (the wooden part of the wall). This band is there because you don't want the canvas to be in contact with the ground because it will absorb water and possibly start to rot. Plus we didn't make a door flap yet. But at this point we were really excited to get the yurt built to see if what we sewed so far was okay or not.
----------------------------------------------------------------------------------------------------
Original Post:
Yurt Almost Done!
[Thursday, February 18, 2010]
Before my sister, Nicole, left we put up the yurt at the park to see how well everything we sewed went together. This post will mainly be pictures, since they explain a lot more than what I could say in words.
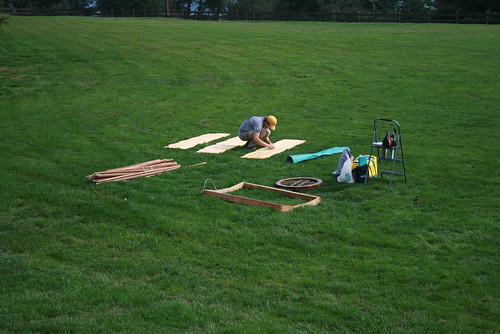
Romy setting the pieces of the yurt out in the grass. It really helps to have a step ladder.
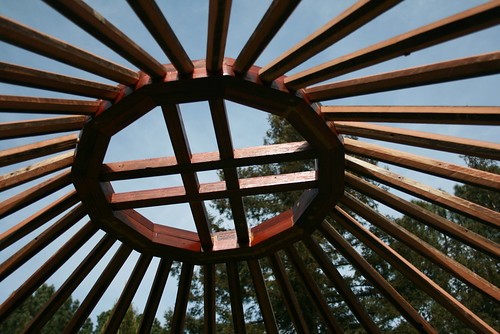
The redwood crown.
Romy pushing the roof canvas on top. Its actually pretty heavy!
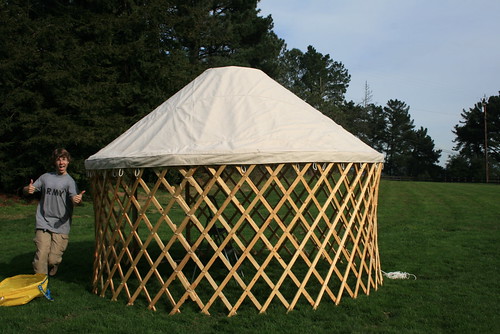
Alright! Romy gives thumbs - the roof fits and the roof band is tight.
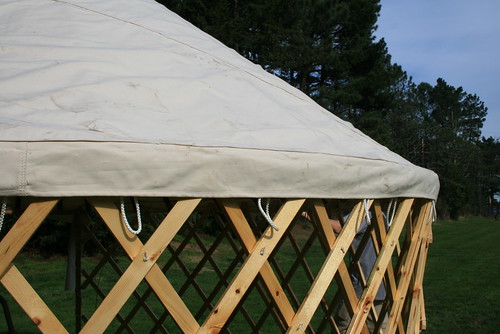
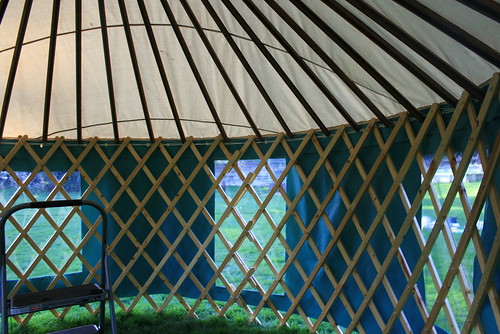
A close up of the roof and roof band. You can see some of the rope loops hanging down - that's where the wall will attach.
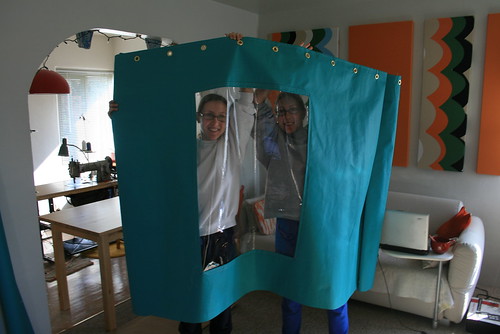
Unrolling the yurt wall. You can see all of the windows are sewn in. The wall is 36ft long.
Nicole attaches the wall to the roof using the loop-rope system. The wall must be attached from the inside of the yurt by design.
The roof had to be pushed up while tying the wall to the roof.
The wall wraps around the door frame and is tightened with rope.
The wall is fully attached. The bottom band isn't sewn on yet, that's why the wall is just short of the ground. The bottom band will be made out of vinyl which will not absorb water and rot.
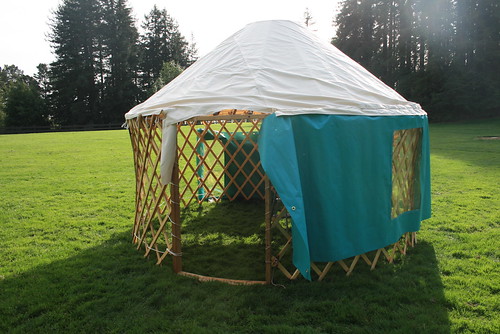
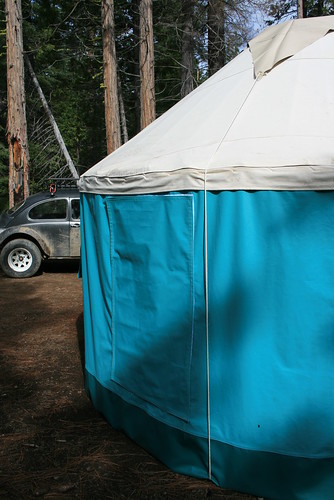
An outside view of the yurt. You can see the two sizes of windows.
The roof line and a window.
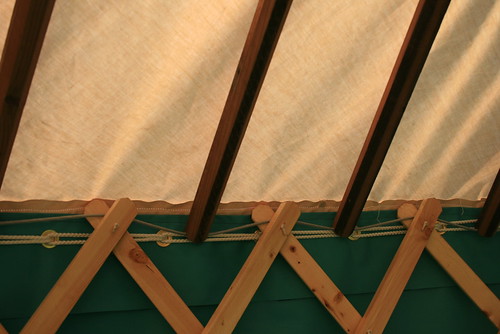
You can see in this picture how the walls attach to the roof. The loops of rope interlock with each other as you feed them through the grommets. The wall is not supported by the tension cable, as many popular designs call for.
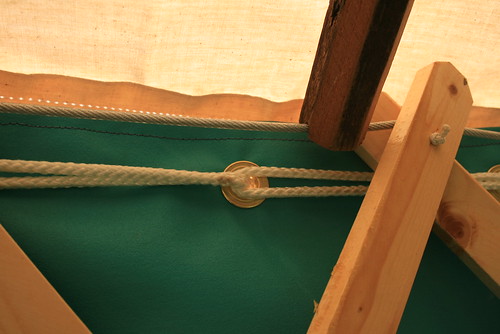
Close up of the rope loop system.
You might notice that the yurt doesn't yet have a door flap and the wall doesn't reach all the way to the ground. I still have to complete the bottom band, which will extend the wall to the ground and connect to the vinyl floor (still have to make the floor to!) with velcro. I have to finish this all in the next two weeks because that's when the maiden yurt voyage will be to the hot springs near Mammoth Lakes!
----------------------------------------------------------------------------------------------------
Original Post:
Yurt Window Covers
[Friday, May 21, 2010]
One of the last things I just finished on the yurt are the window covers. Since I sewed the clear plastic directly into the wall cutting out the canvas material, I had no way to cover the windows unless I made covers. I thought about different ways to attach the window covers, like heavy plastic zippers, rope and grommets or velcro, and the velcro won. It also made the most sense to attach the window covers on the outside of the yurt, which at first sounds inconvenient, but its not actually that bad. Attaching the window covers on the inside would be nearly impossible since the khana are in the way between you and the canvas wall and windows. If you want to open up the window covers to let in light in the morning, you have to go outside. Also, if somebody walks by, they can just yank open a cover an look in. But so far, I haven't encountered any weirdos in the middle of the forest that have done that. And usually in the morning when I need a bathroom break in the woods, thats also a good time to open up the covers to let some light into the yurt.

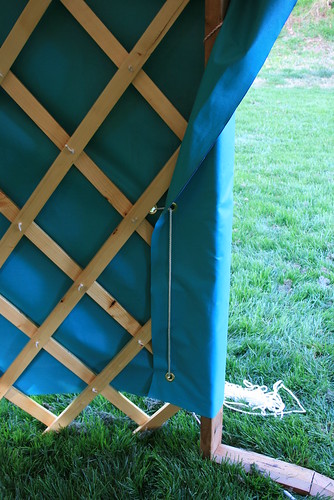
Close up of the velcro that attaches the window covers.
I started by sewing the hooked part of the velcro strip onto the canvas wall bordering the windows. Then I measured out a slightly over-sized piece of canvas which would be the actual cover, and hemmed the edges. Finally I sewed the fuzzy soft part of the velcro strip around the edges of the canvas cover. I chose to put the hooked side on the yurt wall because it is easier to clean if the wall gets dirty. The covers have a better chance of staying clean.
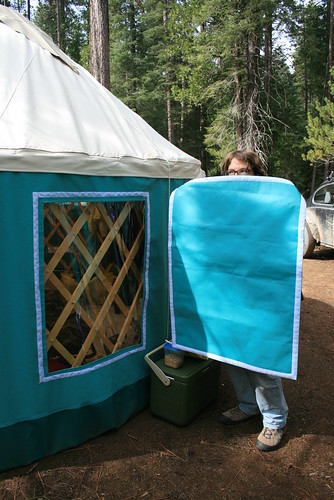
The first step is to get the window cover aligned with the window.
I started experimenting with different ways of attaching the covers over the windows. Since they attach with velcro, you can slap then on almost any way you like. The best option I found was to put the window cover on completely, and then peel back the cover until you expose enough of the window to let in as much light as you want.
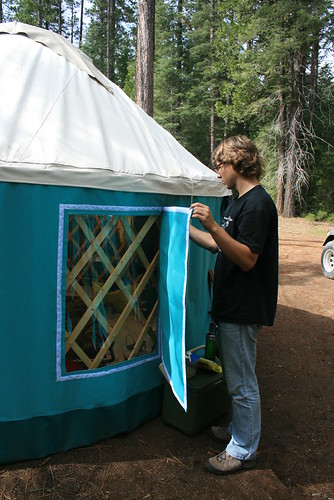
The second step is to stick the window cover onto the window and press the velcro together so it sticks.
A window covered by its cover.
Peel back the window cover until you have enough light coming through the window.
This is what a half peeled down window cover looks like from the inside of the yurt.